LCA Cursor Documentation
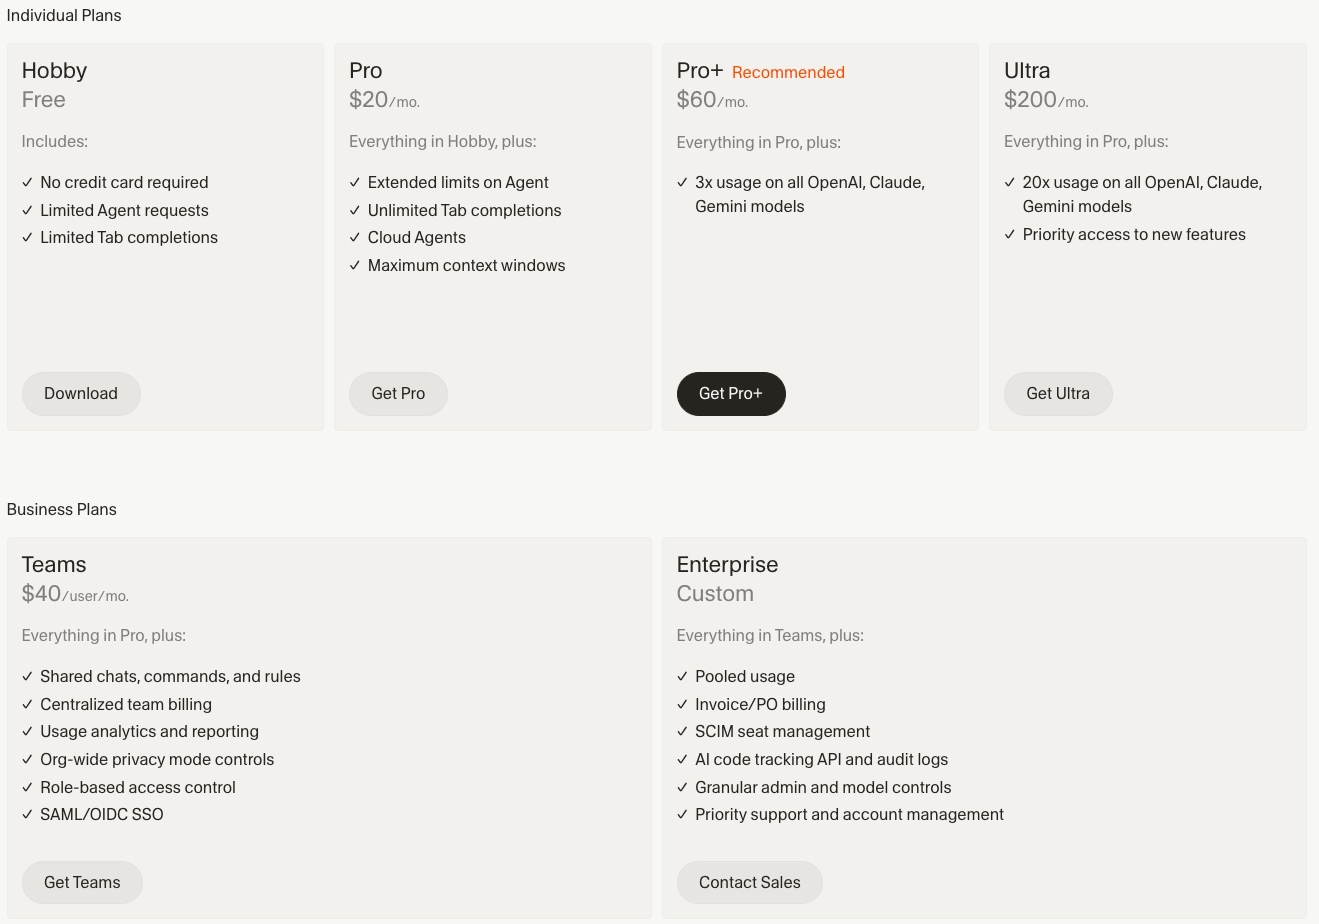
Cursor Subscription Plan
Deployment
Code Management and Versioning
GitHub (add the LCA GitHub link)
Gitflow (Git organization)
Gitflow is a structured Git branching model designed for managing large projects and scheduled release cycles. It uses two main, permanent branches—
master(ormain, for production-ready code) anddevelop(for integration)—along with supporting branches likefeature,release, andhotfixto manage parallel development and isolated code changes.
QA - Automated Code Testing
Automated unit tests are the practice of using software tools to verify the smallest testable parts of an application—such as functions, classes, or methods—independently and automatically.
Unlike manual testing, automation allows these checks to run in milliseconds every time code is changed, providing developers with immediate feedback.
Key Benefits
Early Bug Detection: Catching errors during the development phase is significantly cheaper than fixing them in production.
Safe Refactoring: Developers can clean up or optimize code confidently, knowing the tests will flag any broken functionality (regression).
Living Documentation: Well-written tests act as technical documentation, showing exactly how a piece of code is intended to behave.
CI/CD Integration: Tests can be triggered automatically in pipelines (using tools like GitHub Actions or Jenkins) to prevent faulty code from being merged.
The AAA Pattern (Structure)
Most effective unit tests follow the Arrange, Act, Assert pattern:
Arrange: Set up the objects, data, and preconditions necessary for the test.
Act: Execute the specific function or method being tested.
Assert: Verify that the actual outcome matches the expected result.
Popular Frameworks by Language
To implement these tests, developers use specialized frameworks:
Language | Popular Frameworks |
|---|---|
Java | JUnit, TestNG |
Python | pytest, unittest |
JavaScript | Jest, Mocha |
C# / .NET | xUnit.net, NUnit |
PHP | PHPUnit |
Automated tests (code)
Unit tests
E2E
Lib: Play Right
Jest
Best Practices
Isolation: Use mocks or stubs to simulate external dependencies (like databases or APIs) so you are only testing the logic of the unit itself.
Fast execution: Unit tests should be lightweight and run quickly to encourage frequent use.
Determinism: A test should either pass or fail consistently; it should not be "flaky" or depend on the order of execution.
PRD (Product Requirements Document)
What is a PRD
PRD (Product Requirements Document) is the document that defines what the product must do.
It describes:
Product goals
Functional requirements
Business rules
User roles
Expected behaviors
It does not describe implementation details or code architecture.
In Vibe Code workflows, the PRD becomes the main operational context for the LLM.
Why a PRD is Critical in Vibe Coding
In traditional development:
Developers keep context and make architectural decisions.
In Vibe Code:
The AI has no implicit context.
Everything must be explicitly defined.
Without a PRD:
Inconsistent code generation
Rework and regressions
Random decisions made by the agent
Loss of coherence across features
A PRD works as the project’s single source of truth.
What a PRD Is Used For in Cursor
Provides permanent project context inside the codebase.
Helps the agent:
Understand flows
Respect business logic
Maintain consistency between files.
Allows prompts to reference structured requirements instead of rewriting context.
Example:
Avoid:
“Create an upload page.”
Prefer:
“Implement section 4.2 – Upload Flow from the PRD.”
How a PRD Should Be Developed for Vibe Code
A modern PRD should be written for both:
Humans
LLMs
Recommended Structure
Product Overview
Goal
Problem being solved
Target users
User Roles
Define all roles clearly (e.g., Customer, Partner, Admin).
Main Flows
Describe step-by-step user actions.
Prefer sequence logic over long paragraphs.
Example:
User opens page
Fills form
Data is saved locally
Navigates to upload
Returns with persisted data
Business Rules
Validation logic
Constraints
Conditional behaviors
Data Model
Entities and fields.
Example:
Project
id
status
quoteAmount
co2Offset
pickupDate
UI / UX Requirements
Input behavior
Button styles
Calendar constraints
Visual rules that affect logic.
Recommended Language and Format
Best format
Markdown (
.md)
Reasons:
LLM-friendly
Easy for Cursor to index
Version-control friendly
Clear structure via headings
Basic Structure Example
# Product Requirements Document ## 1. Overview ## 2. User Roles ## 3. Main Flows ## 4. Business Rules ## 5. Data Model ## 6. UI RequirementsAvoid
PDFs
Long unstructured documents
Large text blocks without headings
LLMs rely heavily on structured headings.
How to Use a PRD in Cursor (Recommended Workflow)
Project Structure
/project/docsPRD.mdflows.mddatabase.md
Workflow
Create the PRD before writing code.
Ask the agent to analyze the PRD first.
Example:
Read PRD.md and summarize:- architecture- main components- state management strategyImplement features by section.
Example:
Implement section 4.3 from PRD:Recycle Upload FlowAlways reference PRD sections when requesting changes.
Update the PRD before updating the code.
Golden rule:
Product changes → update PRD first.
Common Mistake in Vibe Coding
Using chat history as the PRD.
Problems:
Context gets lost.
Instructions become fragmented.
The agent forgets earlier decisions.
Result:
Inconsistent implementation
Frequent regressions
Correct Mental Model
PRD = project brain
Cursor = execution environment
LLM = implementation engine
Advanced Practice (Recommended)
Use a modular PRD structure:
PRD.mdUI_SPEC.mdDATA_MODEL.mdFLOW_UPLOAD.md
Benefits:
Better context retrieval
More accurate code generation
Reduced agent mistakes
Faster iteration
Summary
A PRD in Vibe Code is used to:
Reduce LLM hallucinations
Maintain consistency across the app
Accelerate development
Reduce rework and cost
It should be:
Written in Markdown
Flow-oriented
Explicit about rules
Structured with clear sections
Inside Cursor:
Keep it inside the project
Reference it in prompts
Update it before changing code
Figma Design
Can you “import” a Figma file into Cursor?
Cursor does not import a
.figfile directly like an IDE importing a project.What you typically want is: make Cursor able to read design context (frames, components, tokens, measurements) so the agent can generate code that matches the design.
The most “native” approach today is using Figma’s Dev Mode MCP server + Cursor MCP integration.
Does Cursor have a Figma integration via MCP or API?
MCP (Model Context Protocol): Yes. Cursor supports MCP, and Cursor explicitly documents a Figma MCP workflow for design-to-code context.
Cursor API: Yes, but not for “importing Figma.” Cursor has APIs for Cursor’s own platform (team data / cloud agents, etc.), but that’s not the same as a Figma import pipeline.
Terminal-only approach: Optional fallback. If you don’t use MCP, you can pull design data via Figma API (or third-party CLIs/plugins) and drop artifacts into your repo for Cursor to reference.
Step-by-step: Connect Figma to Cursor using MCP (recommended)
1) Prerequisites
Use the Figma desktop app with Dev Mode available for your seat (Dev/Full seat depending on plan).
Make sure your Cursor version supports MCP integrations.
(Background: Figma introduced a Dev Mode MCP server (beta) to let IDE agents access design data directly.)
2) Enable the Figma Dev Mode MCP Server
Open Figma Desktop
Go to Preferences
Enable Dev Mode MCP Server (wording may vary slightly by version)
A commonly referenced flow is exactly this “enable Dev Mode MCP server” step in the desktop app.
3) Add the MCP server in Cursor
Open Cursor
Open Settings
Go to Integrations (or MCP section, depending on your build)
Add/connect an MCP server
Select/configure the Figma MCP connection
Cursor’s docs describe MCP as the mechanism to connect external systems into Cursor’s agent context.
4) Provide the Figma link you want Cursor to reference
In Figma, copy the link to:
the file, or
a specific frame/selection (preferred, more targeted context)
In Cursor, paste that link in your prompt (or into whatever MCP “add context” UI your Cursor build provides)
Cursor’s designer-oriented guidance is specifically: copy a Figma link, and Cursor can reference frames/tokens to generate code matching the design.
5) Use the design context in prompts (practical pattern)
Example prompt style:
“Using the connected Figma context, generate the
<ComponentName>in Next.js + Tailwind, matching spacing, typography, and colors. Output only code.”
Step-by-step: Do it through the terminal (fallback / complementary)
This is useful if:
you can’t enable Dev Mode MCP in Figma, or
you want a reproducible pipeline in CI, or
you want design tokens/assets committed into the repo.
Option A) Export assets (SVG/PNG) and store them in the repo
In Figma:
Select layers → Export → SVG/PNG
In your repo:
/assets/icons/.../assets/images/...
In Cursor:
Ask the agent to implement components using those local assets.
Option B) Pull data via the Figma API (tokens/frames metadata)
High-level steps:
Create a Figma personal access token
Use Figma REST API to fetch:
file JSON
specific node/frame data
Save outputs into your repo, e.g.:
/docs/figma/file.json/docs/figma/tokens.json
Then prompt Cursor using those files as the “source of truth”
(If you want, I can give you a ready-to-run script template, but the exact commands depend on whether you want full file JSON, specific nodes, or token extraction.)
Option C) Use a design-to-code tool/CLI
Some teams use third-party tooling to generate code from Figma (then Cursor refines it). For example, Builder.io provides a “Figma-to-code” flow via CLI.
Security note (important if you use third-party MCP bridges)
There have been reported vulnerabilities in at least one third-party Figma MCP bridge package (“figma-developer-mpc”), including command injection risk; the recommended mitigation was upgrading to a patched version and avoiding unsafe command execution patterns.
Practical takeaway:
Prefer official/well-maintained integrations.
Keep MCP servers and related packages updated.
What I’d do in your workflow (Cursor + Vibe Code)
Use MCP for day-to-day design-aware coding (fast feedback).
Use a terminal export pipeline for assets/tokens you want versioned and stable in the repo.
If you tell me your stack for this project (Next.js? React Native? Tailwind? shadcn?), I can tailor the exact prompt pattern and folder structure so Cursor consistently “locks onto” the Figma source.
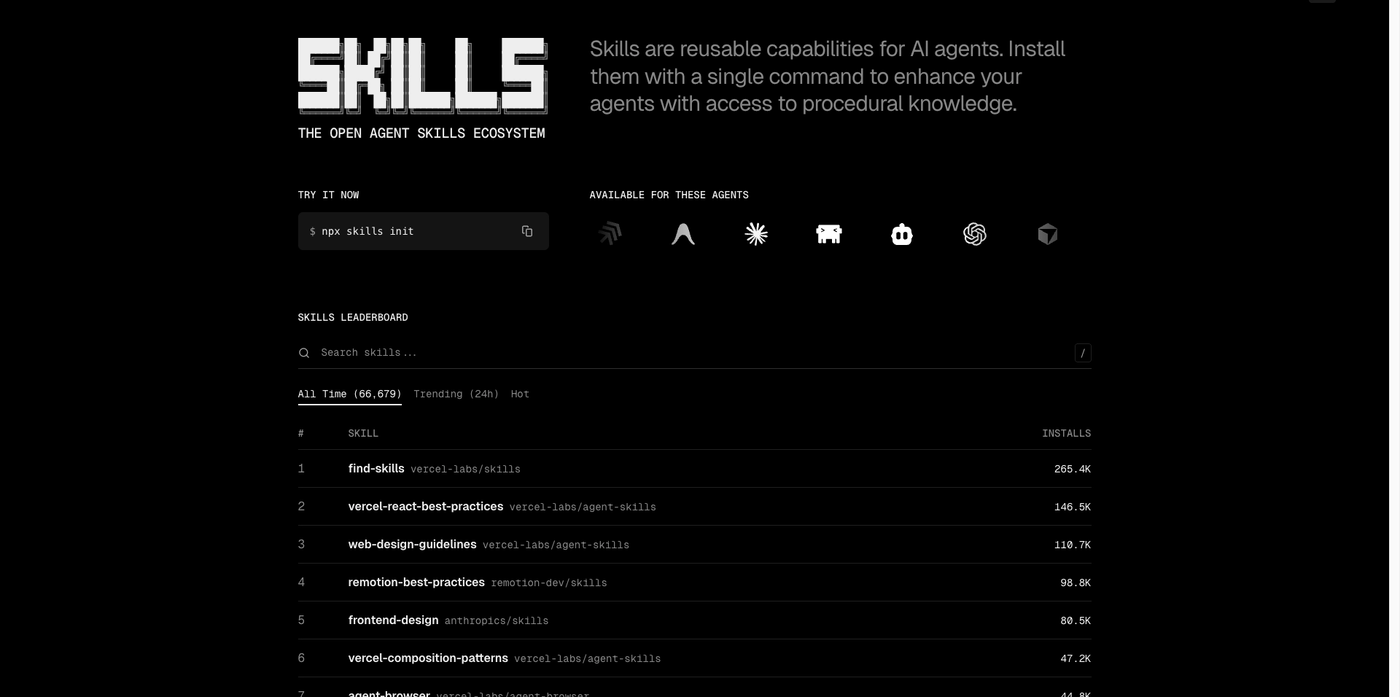
Skills
What Skills Are (especially in the context of https://skills.sh/)
Skills are modular, reusable capabilities for AI coding agents — essentially pre-packaged instruction sets and tooling that teach an agent how to perform specific tasks in a predictable way.
They extend what a code-generation agent can do by adding procedural knowledge, workflows, scripts and templates that agents do not have by default.
The Skills ecosystem (skills.sh) is an open directory and package manager for these skills, letting you browse, install and share them with a single install command.
Skills follow a simple contract (inputs, outputs, execution behavior) so that agents can reliably execute tasks instead of relying solely on generative context.
Why Skills Matter in Vibe Code Development
In Vibe Code development, LLM-based coding agents can generate lots of code, but without consistency and repeatability.
Skills codify best practices, common workflows, framework patterns, and project-specific conventions so that behavior does not vary each time you prompt the agent.
This means less need to re-explain context, styles, or conventions — the agent already “knows” them through installed skills.
Skills help elevate your ability to generate production-ready code instead of prototypes:
Standardized PR generation
Consistent UI implementations
Shared team conventions
Code standards across projects
How and When Skills Are Used
When you should use Skills
Onboarding new team members or agents to a codebase
Ensuring consistent output across teams/agents
Automating repetitive dev workflows
Embedding best practices for a specific stack (React, Next.js, Tailwind, etc.)
Specialized tasks like generating release notes or performing CI/CD steps
Skills act like a shared instruction layer between humans, projects, and agents, making outcomes reliable and predictable.
Using Skills with Cursor
Where Skills Live
Skills are typically installed into project-local locations that Cursor can read:
For Cursor:
.cursor/skills/For other agents (if sharing skills): e.g.,
.claude/skills/or corresponding folders
Installing Skills
Open your project directory (the same repo that Cursor will work in).
Use the Skills CLI from skills.sh:
npx skills add <owner/repo>This fetches a skill package from the skills.sh directory and installs it into your project.
Example:
npx skills add vercel-labs/agent-skills
Confirm that
.cursor/skills/<skill>appears in your project structure.
Using Skills in Cursor Prompts
Once installed, Cursor will automatically include the skill’s instructions when resolving tasks in that project.
You can prompt the agent assuming the skills are available:
Using installed skills, generate a React component that follows our design system conventions.Skills ensure the agent does not have to re-interpret repeated patterns, reducing ambiguity and variance.
Updating and Managing Skills
Use the Skills CLI to check or update installed skills:
npx skills checknpx skills updateThis keeps your project’s procedural knowledge fresh and in sync with the ecosystem.
Practical Example
Install a UI guideline skill:
npx skills add vercel-labs/vercel-react-best-practicesCursor now has standard conventions for React components.
When you ask Cursor to build UI, the agent will generate code that matches those conventions because the skill is present.
Skills vs Human Hard Skills and Soft Skills (relevant context)
In human development, skills often refer to hard skills (technical expertise) and soft skills (communication, collaboration) that impact productivity and teamwork.
In agent workflows, agent skills (skills.sh) play an analogous role — they represent accumulated procedural knowledge that makes an AI agent more effective, reliable, and aligned with project standards.
Summary
Skills (via skills.sh) equip AI agents with reusable, reliable capabilities that extend beyond ad-hoc prompts.
They matter in Vibe Code because they make output consistent, repeatable, aligned with conventions, and less dependent on prompt phrasing.
To use them with Cursor, install skills into your project’s
.cursor/skills/folder with the Skills CLI and reference them in prompts so that Cursor uses them to guide code generation.